Install Armonic in a new Symfony project
This guide assumes you have Composer and Symfony CLI installed.
If you don't have them installed, you can follow the instructions in the Requirements section.
1.Create a new symfony project
Armonic is a Symfony project, so first of all we need to create a new Symfony project.
You can create a new Symfony project using the Symfony CLI or Composer as shown in the official Symfony documentation.
Let's create a new Symfony project using the Symfony CLI:
symfony new cms-new-project --webapp
By default, Symfony 8.0 version will be used, but you can specify the version of Symfony to use:
symfony new cms-new-project --version="8.0.*" --webapp
- If it's your first time running symfony-cli, it might complain that you lack some needed packages (ie: ext-xml). You can install them with
and try again, but you will need to delete the project folder "cms-new-project" and start over.
After creating the project, you can start the Symfony local web server:
cd cms-new-project
symfony server:start -d
2.Configure database
We use Docker for all our development, as it is the easiest way to manage different projects, services, and dependencies.
Here we use Docker to have a container with the Database, but you could have MySQL installed on your computer as well.
If you don't have Docker installed Requirements section.
Armonic uses Doctrine to manage the database schema. You can use any database supported by Doctrine, but for this example we will use MySQL with Docker.
First of all, you need to modify the composer.yaml file provided by the new Symfony project.
# compose.yaml
services:
    ###> doctrine/doctrine-bundle ###
    database:
        image: mysql:${MYSQL_VERSION:-8.3.0}
        environment:
            MYSQL_DATABASE: ${MYSQL_DB:-app}
            # You should definitely change the password in production
            MYSQL_PASSWORD: ${MYSQL_PASSWORD:-!ChangeMe!}
            MYSQL_USER: ${MYSQL_USER:-app}
            MYSQL_ROOT_PASSWORD: ${MYSQL_ROOT_PASSWORD:-root}
        healthcheck:
            test: [ "CMD", "mysqladmin" ,"ping", "-h", "localhost" ]
            timeout: 20s
            retries: 10
        volumes:
            - database_data:/var/lib/mysqlql/data:rw
    ###< doctrine/doctrine-bundle ###

volumes:
    ###> doctrine/doctrine-bundle ###
    database_data:
    ###< doctrine/doctrine-bundle ###
# compose.override.yaml
services:
    ###> doctrine/doctrine-bundle ###
    database:
        ports:
            - "${MYSQL_PORT:-33061}:3306"
    ###< doctrine/doctrine-bundle ###
3.Start the database
Then you can start the database using Docker Compose:
docker-compose up -d
If you restart your computer at some point, you will need to start the database again with
docker-compose up -d.
You will need to modify the .env file to configure the database connection:
# .env
###> doctrine/doctrine-bundle ###
DATABASE_URL="mysql://app:!ChangeMe!@127.0.0.1:33061/app?serverVersion=8.3.0&charset=utf8mb4"
###< doctrine/doctrine-bundle ###
4.Install armonic
We will use Symfony Flex to install Armonic in the new Symfony project.
For now, configure recipes manually:
composer config --json extra.symfony.endpoint '["https://api.github.com/repos/softspring/recipes/contents/index.json",  "flex://defaults"]'
composer config minimum-stability dev
composer config prefer-stable true
Install armonic package with composer (say Yes or Yes for all packages to install the recipes):
composer require softspring/armonic:6.0.x-dev -W

 Do you want to execute this recipe?
    [y] Yes
    [n] No
    [a] Yes for all packages, only for the current installation session
    [p] Yes permanently, never ask again for this project
    (defaults to n): a
This will install Armonic from the 6.0.x-dev development branch.
Also, you can configure the preferred install type for softspring packages as source:
composer config 'preferred-install.softspring/*' source[!NOTE]
If you get an error like:
Cannot autowire service "...DynamicTypesExtension"... TypeResolverInterface ... no such service exists
add this service definition toconfig/services.yaml:services: Softspring\Component\DynamicFormType\Form\Resolver\TypeResolverInterface: class: Softspring\Component\DynamicFormType\Form\Resolver\ChainTypeResolver arguments: $resolvers: - '@Softspring\CmsBundle\Form\Resolver\AppTypeResolver' - '@Softspring\CmsBundle\Form\Resolver\CmsTypeResolver'and then try again to install the package.
After installing the package, you must run the Doctrine migrations to create the database schema:
To avoid inconsistent migration state errors on first install, start with an empty database:
bin/console doctrine:database:drop --if-exists --force
bin/console doctrine:database:create
bin/console doctrine:migrations:sync-metadata-storage -n
If you use Docker for MySQL, make sure the database volume is also fresh between attempts.
bin/console doctrine:migrations:migrate -n
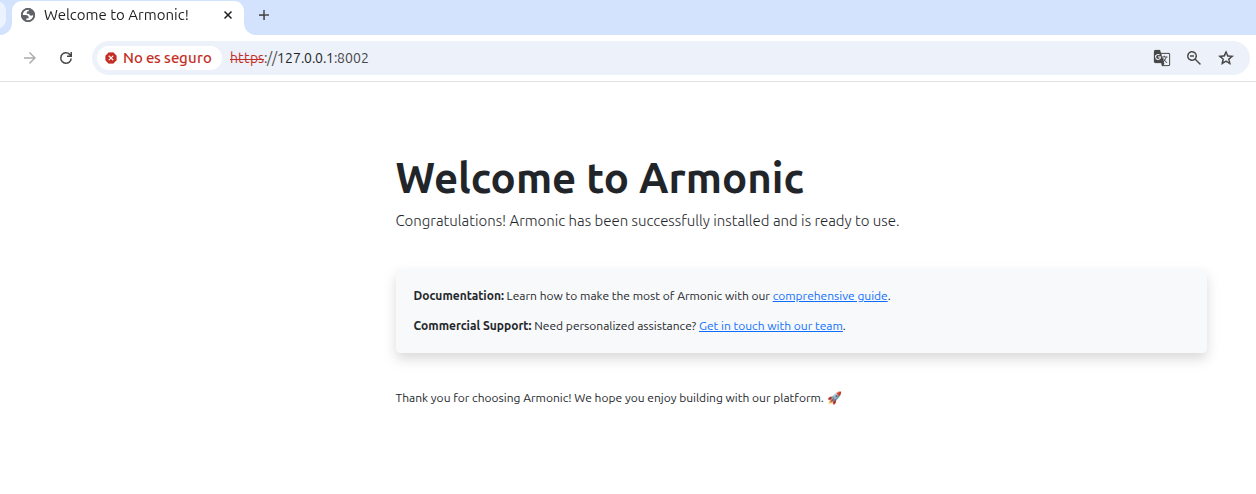
Now you can see the start page of the Armonic project:
5.Configure security
Before you can create your first page, you need to configure security to access the admin area.
You can use any Symfony security configuration or bundle you want, but for this example we will use the Softspring User Bundle.
Configure Softspring User Bundle
Install the Softspring User Bundle with composer:
composer require softspring/user-bundle:^6.0@dev -W
We recommend to use the Symfony flex recipes to configure the bundle:
Do you want to execute this recipe?
    [y] Yes
    [n] No
    [a] Yes for all packages, only for the current installation session
    [p] Yes permanently, never ask again for this project
    (defaults to n): y
Also you can do it manually, see the User Bundle guide.
Then a new User entity has been created, and routes to login, register, and reset password have been added.
But still some manual steps are needed to configure the security.
Run the following commands to configure the security and routes:
mv config/packages/security.yaml.dist config/packages/security.yaml
For older versions of Armonic you might also need to do:
cat config/routes.yaml.dist >> config/routes.yaml
rm config/routes.yaml.dist
Create the database schema with a new Doctrine migration:
If
bin/console doctrine:migrations:diff --namespace="DoctrineMigrations"fails with
Unknown column type "sfs_translation" requested, check that these bundles are enabled inconfig/bundles.php:Softspring\TranslatableBundle\SfsTranslatableBundle::class => ['all' => true], Softspring\Component\DynamicFormType\SfsDynamicFormTypeBundle::class => ['all' => true],and ensure the DBAL type is registered in
config/packages/doctrine.yaml:doctrine: dbal: types: sfs_translation: Softspring\TranslatableBundle\Doctrine\Type\TranslationTypethen run:
bin/console cache:clear
bin/console doctrine:migrations:diff --namespace="DoctrineMigrations"
bin/console doctrine:migrations:migrate -n
Before entering the admin area, you need to create a user and promote it to the admin role.
bin/console sfs:user:create username user@example.com 123456
bin/console sfs:user:promote user@example.com
6. Done!
Now you can go to admin area and login with the user you just created:
https://127.0.0.1:8002/app/login
For the admin area, any URL starting with /admin should redirect you there.
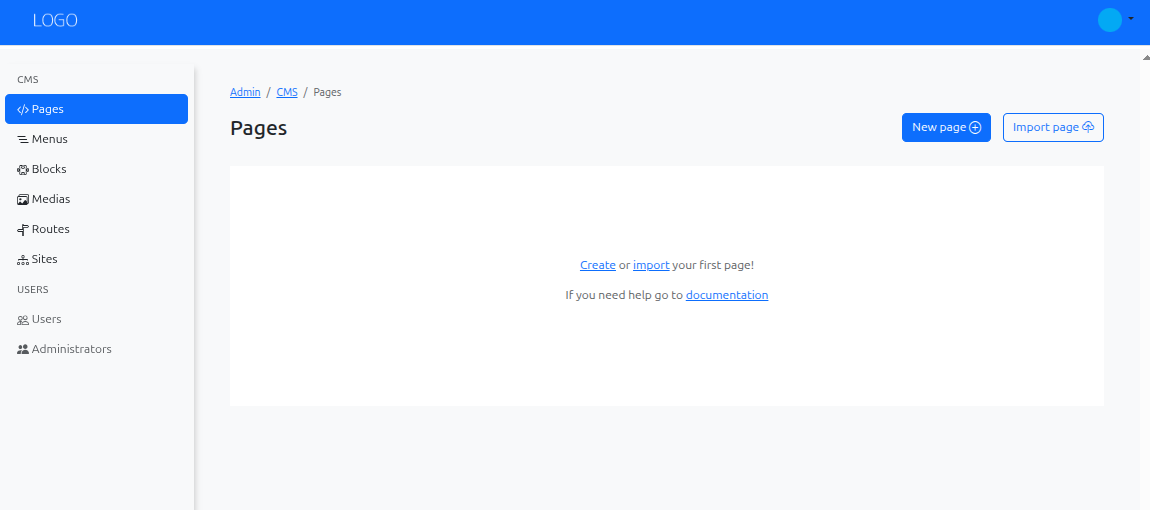
You can try with the pages list in the CMS:
https://127.0.0.1:8002/admin/cms/pages/